
Whether you need to submit a signed form, digitize a stack of receipts, or send homework photos as a single document, knowing how to convert a picture to PDF on Mac saves real time.
The good news: converting an image to a PDF on a Mac requires no third-party app or download. Every method in this guide uses tools already on your MacBook Air or iMac.
This article walks through five distinct approaches—converting a single image in Mac Preview, using the print dialog, combining multiple pictures into one PDF, handling HEIC photos from your iPhone, and automating the whole process with Shortcuts or Automator.
By the end you’ll know which method fits your workflow, whether you’re a student, a freelancer, or someone who just wants things done fast.
Table of Contents
How to Convert a Single Picture to PDF on Mac with Preview
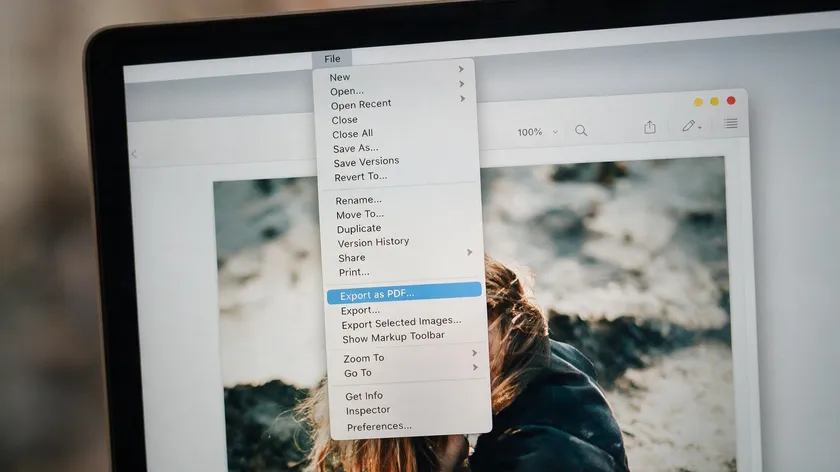
The Preview app is the default image viewer on macOS and a built-in application on macOS Sonoma, Ventura, and earlier releases. You can convert JPG to PDF using Preview on Mac in under a minute—no internet connection needed.
Preview handles all common image file types: JPG files, PNG, HEIC, TIFF, GIF, and BMP. The steps below work identically regardless of the image format you start with.
Steps to export a single image as PDF:
- Locate the image file in Finder. If JPG images open in Photos by default, right-click the file, choose Open With, then select Preview.
- In Preview, go to the top menu: File → Export as PDF.
- Name your new file, choose a save location (desktop, folder, or Google Drive), and click save.
- Optionally, set a password in the security options to restrict who can open the PDF document.
You can export images as PDF using Preview for any supported format—the process is the same whether the source is JPEG, PNG, or TIFF.
Export as PDF vs. Print → Save as PDF: Export preserves the image’s original dimensions with no added margins. Use the print dialog instead when you need to fit images to a specific page size like A4 or US Letter, or when you want to add metadata such as title and author fields.
Convert JPG to PDF Using Print → Save as PDF on Mac
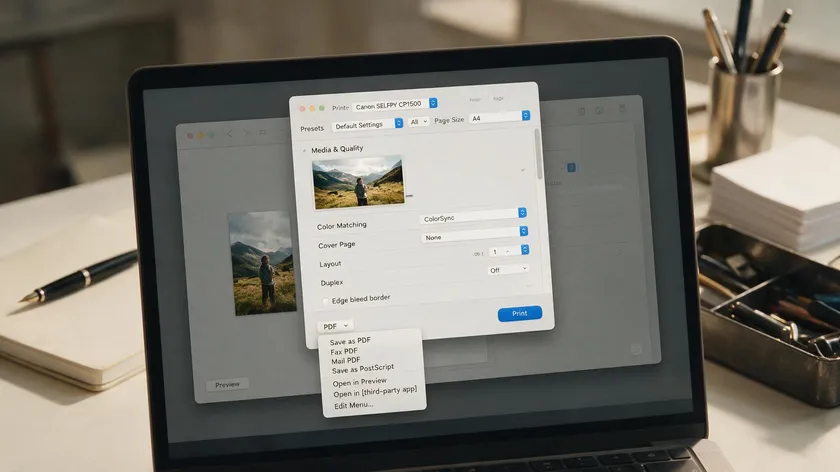
Almost any Mac app with a print dialog—Preview, Photos, Safari, Chrome, or Pages—can convert a JPG file to PDF via the macOS print system. The print dialog can save images as PDF for layout adjustments, making it the better choice when you need precise control over margins and orientation.
Step‑by‑step:
- Open your JPG image in any app and press ⌘P (Command + P) to open the print dialog.
- Click Show Details to reveal orientation, page size, and scaling options. Use the drop-down menu to pick paper size (US Letter, A4, Legal).
- Check the print preview—if the image appears cropped or sideways, cancel, rotate in Preview first, then retry.
- In the lower‑left corner, click the PDF button. A pop-up window with options appears; select Save as PDF.
- Name the PDF file, choose a location, and click save.
This method also works to convert images that are already placed inside a document in Pages or Keynote, not just standalone JPG images.
How to Combine Multiple Images into One PDF in Preview
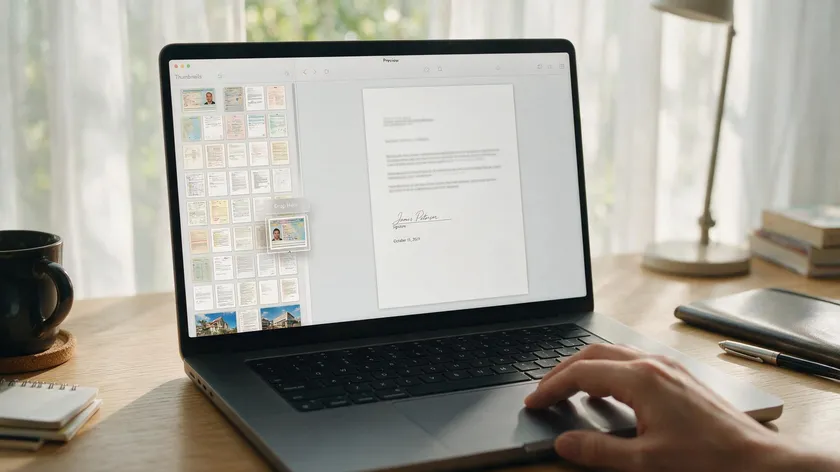
Students scanning homework, professionals compiling signed contracts, or anyone collecting several images often need a single multi-page PDF rather than many loose files. Preview allows combining multiple images into one PDF without extra software.
- In Finder, select your image files—Command‑click to pick individual files or Shift‑click for a range. You can mix JPG files, PNG screenshots, and scanned TIFFs.
- Right click the selection, choose Open With → Preview.
- In Preview, go to View → Thumbnails so all pages appear in the sidebar.
- Simply drag thumbnails up or down to reorder images. You can reorder images in Preview before exporting to PDF, ensuring page 1 sits on top.
- Choose File → Print → Save as PDF to create a single PDF file with multiple pages.
Preview can combine multiple images into a single PDF this way. Some online converters also let you combine and reorder images before exporting, but for most Mac users, Preview is enough and keeps your files off third-party servers.
Use Finder Quick Actions to Create a PDF from Images
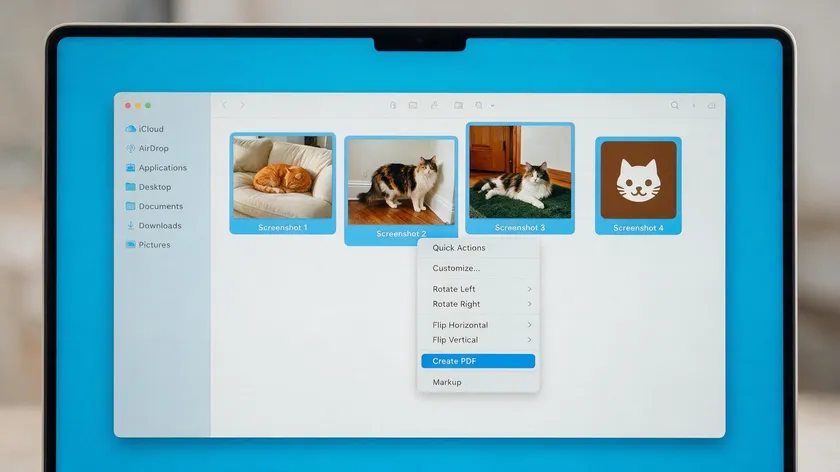
Since macOS Mojave, Finder Quick Actions allow one-click image to PDF conversion—no app window needed. If speed matters more than layout control, this is the fastest path to a new PDF.
- Select one or more image files in Finder.
- Right click (or Control‑click) the selection.
- Choose Quick Actions → Create PDF.
A new file appears in the same folder, named after the first image. When multiple JPG images are selected, Finder orders pages alphabetically by file name. To guarantee the right sequence, rename files with numeric prefixes (01‑receipt, 02‑receipt) before converting. This creates a PDF instantly without ever opening Preview.
Compared to Preview, Quick Actions offers less control—you can’t adjust page size, rotate individual pages, or mark up before saving. But for converting multiple JPGs into one document in seconds, it’s unbeatable.
Edit, Rotate, and Mark Up Images Before Saving as PDF
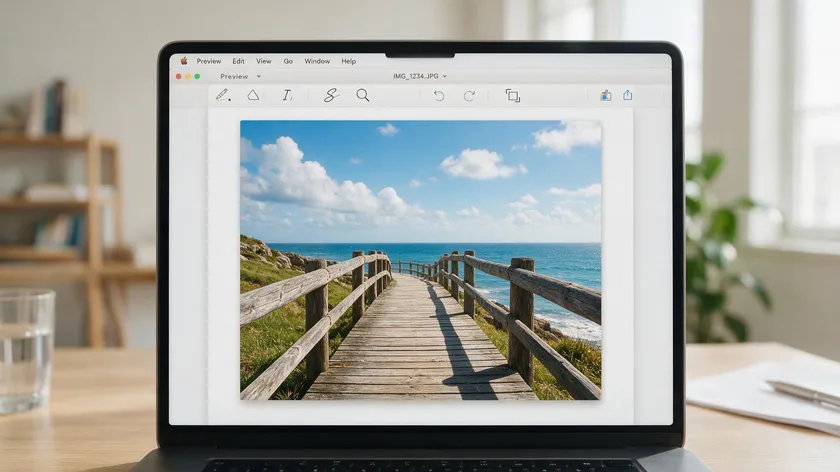
Cleaning up a JPG image in Preview before you convert JPG to PDF prevents common headaches like sideways pages or cluttered backgrounds.
- Rotate / Flip: Use the toolbar buttons or Tools → Rotate Left/Right to fix orientation.
- Crop: Click the selection tool, drag over the area you want to keep, and then Tools → Crop (⌘K) to trim excess borders and improve readability.
- Adjust Color: Open Tools → Adjust Color to tweak exposure, contrast, or saturation on faded scans.
- Markup toolbar: Click the pen icon in the top right corner to access shapes, arrows, text labels, and a signature tool. You can highlight text, add notes, or sign a form directly on the image before exporting.
Editing first is smarter than editing after conversion—the annotated PDF document is ready to share or print without redoing layout steps. If a page appears sideways after conversion, the image likely had embedded EXIF rotation data that wasn’t applied; rotating manually in Preview before export fixes this every time.
Handling HEIC and Other Image File Types on Mac
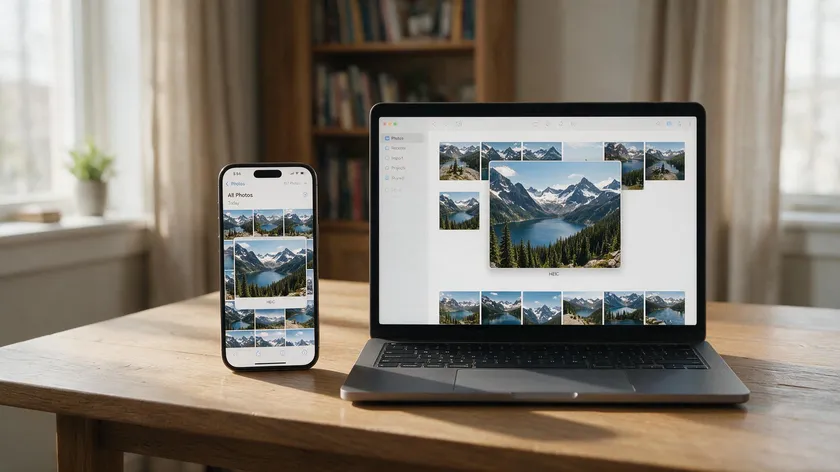
Modern iPhones save photos as HEIC by default. JPEG, PNG, HEIC, and TIFF formats are supported by Preview, so you can open a HEIC photo and export it as PDF directly—no need to first change it to JPG or convert it to another image format.
PDF format preserves image quality better than JPG, and HEIC files are roughly half the size of equivalent JPEGs at similar visual quality. Converting HEIC straight to PDF avoids an unnecessary lossy re-encode step.
The same Quick Actions and Preview workflows apply to all supported file types—PNG, JPEG, TIFF, GIF, BMP, and HEIC. If you need to share with a Windows computer or an older system that doesn’t support HEIC, use File → Export in Preview to change the output to JPG or PNG first and then convert to PDF.
High-quality HEIC or PNG images generally produce sharp PDFs. Quality only drops if you apply aggressive compression later or if the original resolution was low.
Automate Image to PDF Conversion with Shortcuts and Automator
If you convert JPG images to PDF regularly—weekly receipts, daily client proofs, and scanned documents—automation removes the repetitive clicks.
Shortcuts
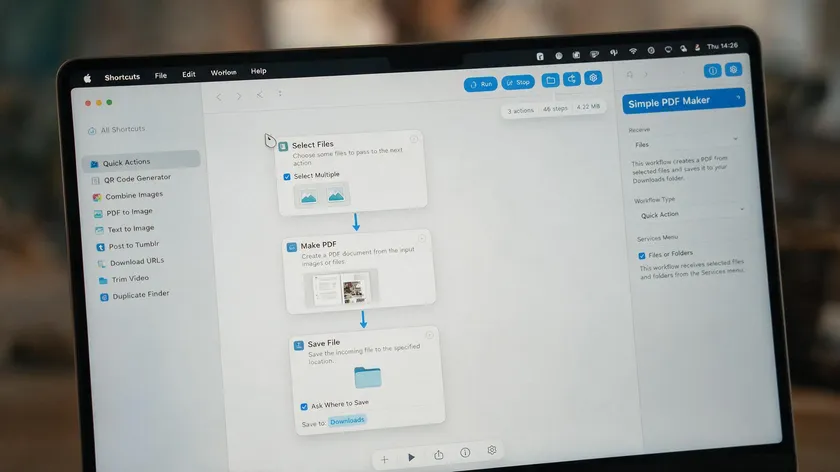
On macOS Monterey and newer, open the Shortcuts app and build a simple workflow:
- Add a Receive Files or Select Files action filtered to image files.
- Add a Make PDF action to convert images into a single PDF file.
- Add a Save File action pointed at a folder like “Converted PDFs.”
Enable the shortcut as a Quick Action so it appears when you right-click files in Finder, or assign a keyboard shortcut for even faster access.
Automator
On older macOS versions, Automator offers a New PDF from Images action under the PDFs category. Build a Quick Action workflow: Ask for Finder Items → New PDF from Images → Move Finder Items. Once saved, it appears in Finder’s right‑click menu under Quick Actions.
A photographer who needs to change JPG sets into client-ready PDFs every day can drop several JPG images into a watched folder and let the Automator folder action produce a combined PDF automatically—no manual steps at all.
Troubleshooting Common Image to PDF Issues on Mac
Converting pictures to PDF on a Mac is usually smooth, but a few predictable issues come up. The table below maps each problem to a concrete fix.
| Problem | Likely Cause | Fix |
|---|
| Pages appear sideways | EXIF rotation metadata ignored | Rotate images manually in Preview before export |
| Blurry or pixelated output | Low-resolution original (under 300 DPI) | A resolution of 300 DPI is standard for print-quality PDFs; retake the photo at higher quality |
| PDF file too large | Many high-res images, no compression | Use the “Reduce File Size” Quartz filter in Preview export, or a dedicated PDF compressor if you need more control |
| Wrong page order | Files selected in arbitrary sequence | Rename files numerically (01, 02, 03) before combining |
| The website rejects the upload. | The site wants PDF, not loose JPGs, or rejects HEIC | Combine images into one PDF first; convert HEIC to JPG via Preview export if the site requires it |
If you need to upload files to a portal that demands a single PDF file, use the combine method from Preview or Quick Actions. Free online converters are also an option and work in any modern browser, useful when you’re away from your Mac—though they require uploading your files to a third-party server, so built-in tools are the more private choice for sensitive documents.
Key Takeaways
- Mac users can convert almost any picture—JPG, PNG, or HEIC—to PDF using built-in tools like Preview, the Print dialog, and Finder Quick Actions, with no extra software required.
- Preview offers the most control: reorder pages, combine multiple images into one multi-page PDF, rotate, crop, and mark up before exporting.
- Finder’s “Create PDF” Quick Action is the fastest way to turn one or several JPG files into a PDF directly from a folder, as long as alphabetical page order is acceptable.
- HEIC and other modern image formats are fully supported on macOS without manual conversion, and frequent tasks can be automated with Shortcuts or Automator.
- You can fix most quality or layout issues—sideways pages, blurry output, oversized files—by editing in Preview first and choosing the right export or compression settings.
If you regularly convert images and documents, explore our advanced PDF conversion tools to handle every file format in one place, quickly and without extra software.
FAQs
Can I convert a picture to PDF on Mac without losing quality?
Yes. When you export from Preview, the image data is embedded in the PDF at its original resolution—no re-compression occurs.
Quality only degrades if you apply a filter like “Reduce File Size” afterward or if the source image was low-resolution to begin with. PDF format preserves image quality better than JPG for archival purposes. For the complete picture on saving images as PDF, see our full guide.
How do I make a searchable PDF from a scanned image on Mac?
Preview creates image-only PDFs by default, so the text in a scanned photo isn’t searchable or selectable. To get editable PDF files with a searchable text layer, you need an OCR (Optical Character Recognition) tool.
Some third-party OCR apps add a searchable text layer on top of the image, letting you search, edit text, and copy content from the resulting PDF.
Is there a way to convert JPG to PDF on Mac without using Preview?
Absolutely. You can use Finder Quick Actions to create a PDF without opening any app. The Photos app also supports File → Print → Save as PDF. Browser-based converters are another option and work without installing software—useful if you’re on a shared or locked-down machine, though they involve uploading your files to a third-party server.
Can I password‑protect a PDF created from images on macOS?
When saving via Print → Save as PDF, click Security Options in the save dialog to require a password to open, copy, or print the PDF. In macOS Monterey and later, Preview’s Export as PDF also includes permission controls with separate owner and user passwords.
What’s the best way to organize many JPG files before converting them to one PDF?
Rename your JPG files numerically in Finder—01-scan, 02-scan, 03-scan—and place them in a dedicated folder. Then select all files and open them in Preview or use Quick Actions.
Both methods respect alphabetical (and therefore numerical) order, so your combined PDF pages appear exactly as intended.
A browser-based converter can also combine images with drag-and-drop reordering if you prefer not to use Preview, though it means uploading your files off your Mac.